Инструменты gimp
Содержание:
- Установка программы
- Support Core Team Developers Directly
- GIMP for Windows
- Digital painting improvements
- Tips
- Plug-ins and manuals in Flatpak GIMP
- Description
- Работа с программой
- Digital photography improvements
- Changing the Size (Dimensions) of an Image (Scale)
- Layers and masks
- Совет 1. Используйте быстрые (горячие) клавиши
- Возможности редактора Gimp
- Source for version 2.8 (Stable)
- Как пользоваться редактором Gimp
- Скачайте GIMP на русском языке бесплатно для Windows
- Adding Fonts for GIMP 2.x
- Step 1
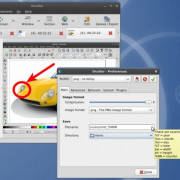
Установка программы

После того как вы скачаете установочный файл и сохраните его на жёстком диске, выполните установку программы.
- В открывшемся окне установщика первым делом выберите удобный для вас язык. Всего их представлено 9, и, если ваш компьютер имеет русскоязычное меню, русский язык будет выбран по умолчанию.
- Чтобы проконтролировать, какие компоненты будут установлены, а также выбрать нужные вам, нажмите кнопку «Настроить» в левом нижнем углу окна установщика.
- Сразу же выскочит пользовательское соглашение, с которым необходимо согласиться. Оно написано на английском и, если вы не владеете ним, просто нажмите кнопку подтверждения, там ничего страшного не написано. Даже если вы знаете английский и полностью прочитали пользовательское соглашение, но с чем-то несогласны, у вас нет другого выбора, кроме как согласиться, иначе установка будет прервана.
- В следующем окне — «Выбор компонентов» — отметьте галочкой те элементы, которые вы хотите использовать в работе. Если вы не хотите слишком долго разбираться, какой компонент за что отвечает, выберите «Полная установка». Если же считаете, что чем-то можно пренебречь, снимите с того пункта отметку. Кроме того, во всплывающем меню можно выбрать несколько пакетов установки: полный, весом почти 300 мегабайт, либо компактный — 128 МБ. После выбора нажмите кнопку «Далее».
- В следующем окошке — «Выбор файловых ассоциаций» — выберите те файлы, которые бы вы хотели открывать редактором Gimp по умолчанию. Утилита автоматически отмечает несколько родных для программы форматов. Если вы хотите применять редактор для других файлов, отметьте их галочками, после чего также нажмите кнопку «Далее».
- В следующем окне вам будет предложено вывести ярлык для быстрого запуска на рабочий стол и панель быстрого запуска. Если вы в них не нуждаетесь, снимите галочки. Для перехода на следующий этап нажмите «Далее».
- В последнем окне выберите папку, куда вы хотите установить Gimp. Нажмите кнопку «Установить» и дождитесь окончания процедуры.
- Запустите программу и подождите некоторое время, пока загрузятся все необходимые компоненты программы.
После того как графический редактор Gimp будет установлен на ваш компьютер, можно приступать к работе с ним. В следующем пункте мы проведём обзор меню программы. Если вы ищите руководство по выполнению конкретных задач, на нашем сайте вы сможете найти посвящённую этому серию статей.
Support Core Team Developers Directly
While we don’t raise funds to sponsor development of GIMP as an organization at this time, we encourage our contributors to run personal fundraisers. Currently there are two such projects.
Øyvind Kolås uses Patreon to raise funds for his work on GEGL, GIMP’s new sophisticated image processing core. This work is crucial to implement features such as non-destructive editing in GIMP, including features known as adjustment layers and layer effects in similar software. Øyvind is the primary developer of GEGL who has been working on it since mid-2000s.
Jehan Pagès runs another Patreon-hosted campaign to raise funds for a GIMP-powered animated movie, ZeMarmot. Part of the funds is spent on development of advanced animation features in GIMP and various other features for professional graphics usage. Jehan is one of the most active contributors to GIMP in recent years who has fixed countless bugs.
GIMP for Windows
Download GIMP 2.10.22
via BitTorrent
Download GIMP 2.10.22
directly
The download links above will attempt to download GIMP from one of our trusted mirror servers.
If the mirrors do not work or you would rather download directly from our server, you can get the direct download here.
Supported OS: Windows 7 or over
These links download the official GIMP installer for Windows (~200 MB).
The installer contains both 32-bit and 64-bit versions of GIMP, and will automatically use the appropriate one.
BitTorrent is a peer-to-peer file sharing system. It works by downloading GIMP from a distributed network of BitTorrent users, and may improve download speed dramatically.
Choosing this option will download the torrent file for the GIMP installer.
You may need to install a torrent client to make use of this file. Learn more…
Hash Sum
The SHA256 hash sum for is:
f7851c348584ce432dfd8e69b74a168c7dec33ebfddc29c96ad2d6b83aded083
Check it on
VirusTotal:
Older Downloads
- Previous v2.10 installers for Windows can be found here: download.gimp.org.
- Previous v2.8 installers for Windows can be found here: download.gimp.org.
GIMP User Manual
These links download language-specific Windows installers for GIMP’s local help.
By default, they will place the help files with your GIMP installation.
Note: GIMP uses online help by default. If you want to use this local help offline, you will need to change GIMP’s help settings.
- In GIMP, select > >
- For «User manual», select «Use a locally installed copy»
- Under «Help Browser», you can choose between your system’s web browser and GIMP’s help browser plugin (if available).
See the for more settings.
Digital painting improvements
GIMP 2.10 ships with a number of improvements requested by digital painters. One
of the most interesting new additions here is the MyPaint Brush tool that
first appeared in the GIMP-Painter fork.
The Smudge tool got updates specifically targeted in painting use case. The
new No erase effect option prevents the tools from changing alpha of pixels.
And the foreground color can now be blended into smudged pixels, controlled by
a new Flow slider, where 0 means no blending.
All painting tools now have explicit Hardness and Force sliders except for
the MyPaint Brush tool that only has the Hardness slider.
Most importantly, GIMP now supports canvas rotation and flipping to help
illustrators checking proportions and perspective.
A new Brush lock to view option gives you a choice whether you want a brush
locked to a certain zoom level and rotation angle of the canvas. The option is
available for all painting tools that use a brush except for the MyPaint Brush tool.
New Symmetry Painting dockable dialog, enabled on per-image basis, allows to
use all painting tools with various symmetries (mirror, mandala, tiling…).
This new version of GIMP also ships with more new brushes available by default.
Contributors: Michael Natterer, Alexia Death, Daniel Sabo, shark0r, Jehan
Pagès, Ell, Jose Americo Gobbo, Aryeom Han…
Tips
How do I draw a straight line?
In any of the drawing tools (Pen, Pencil, etc.), click on one endpoint of the
line. Then hold the shift key and click on the other endpoint.
How do I draw a circle or square?
In the Rectangular or Elliptical selection tool, click in one corner of your
square or circle, then press Shift while dragging toward the other corner. Or
enable the checkbox for Fixed: Aspect Ratio in tool options and make sure the
aspect ratio is set to 1:1 before starting your square or circular selection.
Once you have a selection, Edit->Stroke Selection… will draw a line the
shape of the selection you just made.
For curved selections, like circles, stroking with the Paintbrush paint tool
will usually give a smoother looking line. You can get an even smoother line
by converting the selection to a path (Select->To Path), then using
Edit->Stroke Path… instead of Stroke Selection…
Plug-ins and manuals in Flatpak GIMP
Our official Flatpak now has an extension point for plug-ins. This means
that anyone can now package third-party plug-ins as “Flatpak extensions”
and contribute them to the Flathub repository. Thanks to the contributor
Hubert Figuière, 7 very popular GIMP plug-ins are already available to
Flatpak users: BIMP, FocusBlur, Fourier, G’MIC, GimpLensfun,
LiquidRescale, and Resynthesizer.
The one-liner CLI call to install them all at once is (if GIMP is
already installed as Flatpak, and the Flathub repository is configured):
flatpak install org.gimp.GIMP.Plugin.Resynthesizer org.gimp.GIMP.Plugin.LiquidRescale org.gimp.GIMP.Plugin.Lensfun org.gimp.GIMP.Plugin.GMic org.gimp.GIMP.Plugin.Fourier org.gimp.GIMP.Plugin.FocusBlur org.gimp.GIMP.Plugin.BIMP
Note: Flathub does not yet provide a way to discover software
extensions directly on its web catalog. The following CLI call can be
used to search for GIMP plug-ins:
Moreover, the GIMP manual will now be installed by default when
installing our Flatpak, but not in all languages. To install the manuals
in all available languages, run:
flatpak install --reinstall flathub org.gimp.GIMP.Manual
Flathub statistics indicate that there are nearly 230K users of our
Flatpak package (with about 100K users updating GIMP within the first 2
weeks after a build update), which is pretty decent for a single package
format on GNU/Linux.
Description
GIMP is the GNU Image Manipulation Program. It is used to edit and manipulate images. It can load and save a variety of image formats and can be used to convert between formats.
GIMP can also be used as a paint program. It features a set of drawing and painting tools such as airbrush, clone, pencil, and paint brush. Painting and drawing tools can be applied to an image with a variety of paint modes. It also offers an extensive array of selection tools like rectangle, ellipse, fuzzy select, bezier select, intelligent scissors, and select by color.
GIMP offers a variety of plug-ins that perform a variety of image manipulations. Examples include bumpmap, edge detect, gaussian blur, and many others. In addition, GIMP has several scripting extension which allow for advanced non-interactive processing and creation of images.
GIMP ships with a second binary called gimp-console. This binary is a console-only version and behaves as if gimp was called with the —no-interface command-line option.
On platforms with the D-Bus message bus system, GIMP will by default check if an instance is already running in this user session. If it detects that, it will pass all filenames given on the command-line to the already running GIMP instance and quit.
Работа с программой
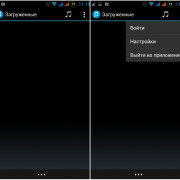
Интерфейс программы несколько непривычен и может быть сложным для новичков. По умолчанию он состоит из трёх отдельных окон: главного окна с рабочей зоной, в которой вы можете обрабатывать изображение или создавать новые рисунки, а также двух окон, в которых можно выбирать необходимые для работы инструменты.

Именно такое расположение и вызывает больше всего дискомфорта. Чтобы переключаться в более привычный однооконный режим, особенно если раньше вы хоть немного работали в Photoshop, в главном окне программы перейдите в меню «Окна», после чего активируйте функцию «Однооконный режим».
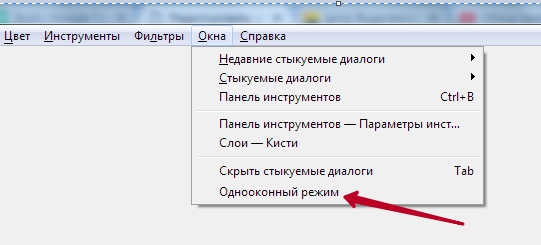
После этого два окна инструментами, которые располагались по бокам экрана, примкнут к основному окну и станут его элементами.

Теперь давайте посмотрим, какую структуру имеет рабочий экран редактора Gimp.
- В самом верху окна располагается главное меню с такими вкладками: Файл, Правка, Выделение, Вид, Изображение, Слой, Цвет, Инструменты, Фильтры, Окна и Справка. В каждой из этих вкладок располагаются другие функции, которые можно использовать для работы.
- В левой стороне экрана, в его верхней части, располагается панель инструментов, в которой можно выбрать все необходимые для обработки графического файла инструменты: перемещение, поворот, вырезание, дублирование, карандаш, кисть, ластик, заливка, штамп, текст, а также многие другие.
- Ниже панели инструментов располагается панель настройки инструмента. Она предоставляет возможность настройки отдельного инструмента и активируется при его выборе в панели выше. Здесь же можно создать несколько профилей настройки каждого инструмента.
- В правой части экрана вверху располагается панель управления слоями, контурами, каналами и историей ваших изменений.
- Чуть ниже можно выбирать различные кисти, градиенты, а также текстуры.
- В самом низу предоставлены инструменты управления профилями кисти. Можно также создать несколько профилей с настройками для различной ситуации.
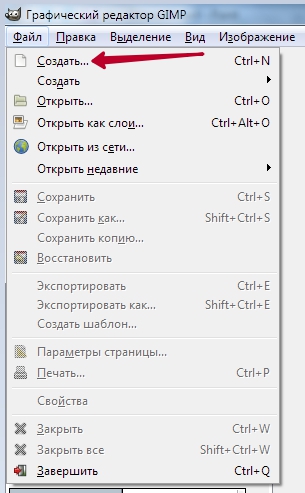
Чтобы отредактировать готовое изображение, нажмите «Файл» — «Открыть».

Для создания нового нажмите Ctrl + N либо же «Файл» — «Создать».
После окончания изменений сохраните файл в желаемом формате.
Digital photography improvements
Some of the new GEGL-based filters are specifically targeted at photographers:
Exposure, Shadows-Highlights, High-pass, Wavelet Decompose, Panorama
Projection and others will be an important addition to your toolbox.
GEGL Shadow-Highlights filter.
GEGL panorama projection allows editing panorama images, mapped.
On top of that, the new Extract Component filter simplifies extracting a
channel of an arbitrary color model (LAB, LCH, CMYK etc.) from currently
selected layer. If you were used to decomposing and recomposing images just for
this, your work will be that easier now.
Moreover, you can now use either darktable or RawTherapee as GIMP plug-ins for
opening raw files. Any recent version of either application will do.
A new Clip Warning display filter will visualize underexposed and overexposed
areas of a photo for you, with customizable colors. For now, it’s mostly geared
towards images where colors are stored with floating point precision. You will
mostly benefit from this if you work on 16/32 bit per channel float images such
as EXR and TIFF.
Your browser does not support the video tag.
Contributors: Michael Natterer, Ell, Thomas Manni, Tobias Ellinghaus,
Øyvind Kolås, Jehan Pagès, Alberto Griggio…
Changing the Size (Dimensions) of an Image (Scale)
This is a very simple task to accomplish in GIMP easily.
The image we’ll be using to illustrate this with is The Horsehead Nebula in Infrared.
When you first open your image in GIMP, chances are that the image will be zoomed so that the entire image fits in your canvas. The thing to notice for this example is that by default the window decoration at the top of GIMP will show you some information about the image.
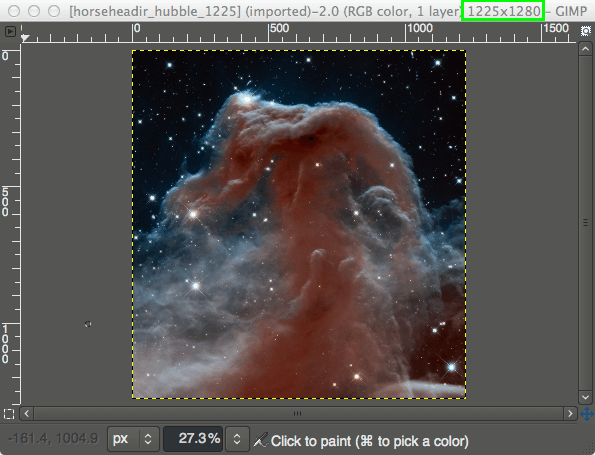
View of the GIMP canvas, with information at the top of the window.
Notice that the information at the top of the window shows the current pixel dimensions of the image (in this case, the pixel size is 1225×1280).
To resize the image to new dimensions, we need only invoke the Scale Image dialog:
Image → Scale Image…
This will then open the Scale Image dialog:
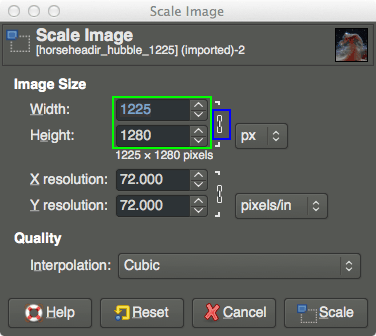
The Scale Image dialog.
In the Scale Image dialog, you’ll find a place to enter new values for Width and Height. If you know one of the new dimensions you’d like for the image, fill in the appropriate one here.
You’ll also notice a small chain just to the right of the Width and Height entry boxes. This icon shows that the Width and Height values are locked with respect to each other, meaning that changing one value will cause the other to change in order to keep the same aspect ratio (no strange compression or stretching in the image).
For example, if you knew that you wanted your image to have a new width of 600px, you can enter that value in the Width input, and the Height will automatically change to maintain the aspect ratio of the image:
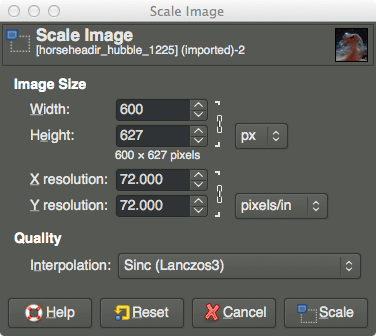
Changing the Width to 600px.
As you can see, entering 600px for the width automatically changes the height to 627px.
Also notice I have shown a different option under Quality → Interpolation. The default value for this is Cubic, but to retain the best quality it would better to use Sinc (Lanczos3).
If you want to specify a new size using a different type of value (other than Pixel size), you can change the type by clicking on the “px” spinner:

Changing input value types.
A common use for this could be if you wanted to specify a new size as a percentage of the old one. In this case you could change to “percent”, and then enter 50 in either field to scale the image in half.
Once you are done scaling the image, don’t forget to export the changes you’ve made:
File → Export…
to export as a new filename, or:
File → Overwrite {FILENAME}
to overwrite the original file (use caution).
For more detail about using Scale Image, you can see the documentation.
Layers and masks
GIMP now ships with two groups of blending modes: legacy (perceptual, mostly
to make old XCF files look exactly as before) and default (mostly linear).
New blend modes are:
- LCH layer modes: Hue, Chroma, Color, and Lightness
- Pass-Through mode for layer groups
- Linear Burn, Vivid Light, Linear Light, Pin Light, Hard Mix, Exclusion, Merge,
and Split
Layers, paths, and channels can also be tagged with color labels to improve
project organization. This will be even more useful once we add multi-layer
selection later on.
Compositing options for layers are exposed to users now, and all layer-related
settings are finally available in the Layer Attributes dialog.
Moreover, if you always need alpha in your layers, you can enable automatic
generation of the alpha channel in imported images upon opening them. See
Edit > Preferences > Image Import & Export page for this and more policies.
Layer groups can finally have masks on:
Совет 1. Используйте быстрые (горячие) клавиши
Этот совет я поставил на первое место. Почему? Да потому, что использование горячих клавиш позволяет в сотни раз ускорить вашу работу с любой программой, в том числе и с графическим редактором GIMP.
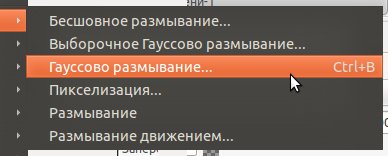
Как известно в программах с большим количеством команд существуют специальные клавиатурные комбинации, так называемые «горячие клавиши». Немного поясню, на самые частые действия вы можете установить любое сочетание клавиш, что потом не лазить по меню в поисках, например фильтра, а быстро нажать две кнопки на клавиатуре и вызвать диалоговое окно нужного фильтра, например «Гауссово размывание».
Так что, если хотите подняться на одну ступень мастерства выше, то забудьте про мышь. Ой, нет, конечно, полностью отказываться от мышки не стоит. Я шучу, но вот совместное применение быстрых кнопок плюс мышь дает сногсшибательный результат при обработке фотографий и значительно экономит ваше драгоценное время, которого иногда так не хватает.
Для того чтобы изменить существующие настройки горячих клавиш переедите в меню «Правка — Комбинации клавиш».
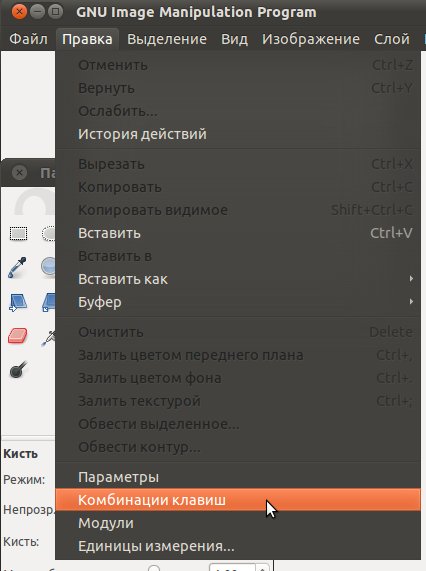
Перед вами откроется диалоговое окно со списком всех команд и функций, доступных в графическом редакторе GIMP
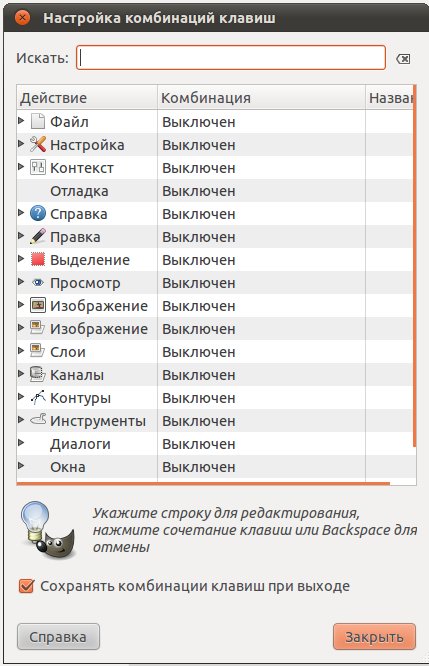
Здесь вы легко можете изменить существующие клавиши или добавить новые клавиатурные комбинации.
Кроме выше перечисленного достоинства использования «горячих клавиш» в редакторе имеется еще одна интересная функция под названием «Динамические комбинации клавиш».
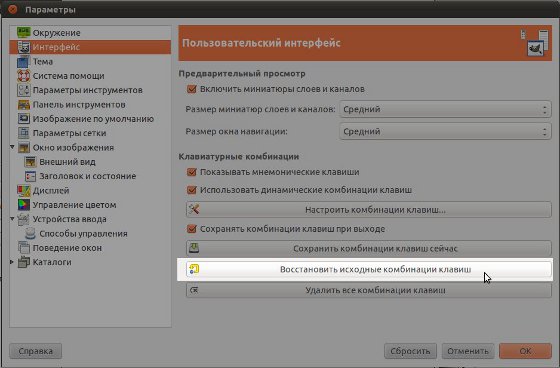
По умолчанию данная функция отключена и для того чтобы ее активировать, давайте перейдем в «Правка – Параметры – Интерфейс» и поставим галочку вот сюда.

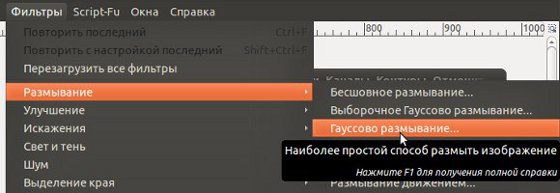
Таким образом, у нас появится возможность назначить клавиатурные комбинации «на лету». Для примера сделайте активным меню «Фильтры – Размывание – Гауссово размывание»
854
Теперь нажмите любое сочинение клавиш на клавиатуре, например «Ctrl+B». Таким образом, рядом с этим пунктом появится наша клавиатурная комбинация.
Теперь для вызова фильтра «Гауссово размывание» нам просто необходимо нажать ту комбинацию клавиш, которою мы задали. Вот и все.
Настройки горячих клавиш хранятся в файле «menurc», который вы можете найти в каталоге:
Куда вы установили GIMP/GIMP-2.0/etc/gimp/2.0/
Здесь же находится файл, в котором записаны клавиатурные сочетания клавиш из графического редактора Фотошопа шестой версии «ps-menurc». Для того чтобы воспользоваться горячими клавишами Фотошопа в редакторе гимп, вы должны переименовать файл «ps-menurc» в «menurc». Предварительно переименовав файл «menurc», например в «menurc2»
Вы также легко можете восстановить исходные настройки клавиш, просто нажав на пункт «Восстановить исходные комбинации клавиш».
После этого появится окно, где сообщится информация, что исходные комбинации будут восстановлены после перезапуска редактора.
Возможности редактора Gimp
Графический редактор Gimp позволяет выполнять широкий спектр операций с различными изображениями. Он поддерживает большое количество форматов, имеет множество предустановленных фильтров, кистей и шаблонов. Если вас не устраивает изначальный функционал, его можно расширить за счёт дополнительных модулей. Итак, что же умеет программа?
- Создание и продвинутая обработка графических файлов, фотографий, логотипов, рисунков. Можно менять размер, редактировать цвет, соединить несколько фото в одно, настраивать уровень яркости, контрастности, цветового баланса, искажений, преобразовывать картинки из одного формата в другой.
- Поддержка родного формата XCF, а также JPG, JPEG, GIF, TIFF, PNM, MPEG, PNG, TGA, TIF, PS, XPM, BMP, SGI, PDF, ICO, PCX и множества других. И также предоставляется ограниченная поддержка PSD — оригинального формата Photoshop.
- Рисование. Для создания полноценных рисунков доступен полный набор рабочих инструментов, включающих карандаши, кисти, штампы и другие. Каждый элемент можно тонко настроить, изменить толщину и форму линий, а также прозрачность.
- Создание многослойных проектов. Каждый элемент может наноситься в виде отдельного слоя, который затем в случае необходимости очень легко удалить или подкорректировать. А также доступна полная настройка альфа-канала.
- Полный набор инструментов для преобразования и трансформации: наклон, масштаб, поворот, вращение, отражение.
- Выделение фрагмента изображения. Доступны такие инструменты выделения, как фрагмент свободной формы, эллипс, прямоугольник, а также интеллектуальное выделение.
- Поддержка сканеров и графических планшетов.
- Большое количество встроенных фильтров, возможность как поштучной, так и пакетной обработки файлов.
- История. Все ваши действия хранятся в разделе «История», благодаря чему вы сможете отслеживать все выполненные изменения.
- Анимация. Обработка анимационных файлов формата MNG. Каждый кадр обрабатывается как отдельный слой.
- Многоязычное меню, включая качественный перевод на русский и украинский языки.
- Детальная настройка интерфейса, возможность работать в классическом многооконном меню, так и в более привычном для новичков однооконном.
- Интеграция внешних инструментов, разработанных специально для редактора Gimp.
- Автоматизация ваших операций за счёт скриптов, написанных на языках Perl, Python и Script-Fu.
Source for version 2.8 (Stable)
GIMP releases available from gimp.org and its contain the source code and have to be compiled in order to be installed on your system.
For instructions, how to build GIMP from source code, please see this page.
GIMP 2.8.22 is now available at https://download.gimp.org/mirror/pub/gimp/v2.8/. You may want to read the Release Notes for GIMP 2.8.
To allow you to check the integrity of the tarballs, here are the MD5 sums of the latest releases:
gimp-2.8.22.tar.bz27e4fd7a53b1d3c32dff642ab1a94b44d
gimp-2.8.20.tar.bz2d405640c426b234d6efc36fb4f5bae57
gimp-2.8.18.tar.bz25adaa11a68bc8a42bb2c778fee4d389c
gimp-2.8.16.tar.bz230e0a1b7c18b0e3415f4ac54567252ac
gimp-2.8.14.tar.bz2233c948203383fa078434cc3f8f925cb
gimp-2.8.12.tar.bz247fefa240c38cfb1016b57ad6324378d
gimp-2.8.10.tar.bz284c964aab7044489af69f7319bb59b47
gimp-2.8.8.tar.bz2ef2547c3514a1096931637bd6250635a
gimp-2.8.6.tar.bz212b3fdf33d1f07ae79b412a9e38b9693
gimp-2.8.4.tar.bz2392592e8755d046317878d226145900f
gimp-2.8.2.tar.bz2b542138820ca3a41cbd63fc331907955
gimp-2.8.0.tar.bz228997d14055f15db063eb92e1c8a7ebb
GIMP help files are available at https://download.gimp.org/mirror/pub/gimp/help/.
Please consider using one of the mirrors listed below.
Как пользоваться редактором Gimp
Для начала скачайте программу на свой компьютер. Всегда свежую версию можно получить на официальном сайте. Выберите версию для своей операционной системы. Ссылка по кнопке ниже.
Установите программу на компьютер и запустите её. Вы увидите интерфейс с разнообразными инструментами редактирования. Всё выглядит и расположено привычно, интуитивно понятно, как и во всех подобных редакторах.
 Интерфейс редактора.
Для того, чтобы начать пользоваться редактором Gimp, нужно либо создать в нём изображение самостоятельно, либо загрузить готовое фото, и начать его редактировать, изменять. Нажмите в верхнем меню «Файл», а затем либо «Создать проект», либо «Открыть». Можно также использовать традиционные для этого горячие клавиши — ctrl + N или ctrl + O, соответственно.
 Откройте изображение или создайте новое, чтобы начать пользоваться редактором Gimp.
Вы увидите изображение на рабочем пространстве и сможете выполнять с ними разнообразные операции с помощью инструментов, расположенных в панелях управления.
 Изображение, загруженное в Gimp готово к редактированию.
Давайте рассмотрим ниже, какие инструменты для работы с изображением есть в этом редакторе.
Скачайте GIMP на русском языке бесплатно для Windows
| Версия | Платформа | Язык | Размер | Формат | Загрузка |
|---|---|---|---|---|---|
|
GIMP v2.8 |
Windows |
Русский | 85,4MB | .exe |
Скачать |
|
GIMP v2.8 для MAC |
MAC | Русский | 55,9MB | .dmg |
Скачать |
Обзор GIMP
GIMP (Гимп) – бесплатный графический редактор, имеющий отличный набор инструментов для работы с растровой графикой и более скромный набор функций для обработки векторных изображений. С помощью GIMP можно создавать логотипы и другие графические элементы, выполнять ретуширование и коррекцию фотографий, масштабирование и кадрирование изображение, преобразовывать формат файлов.
Функциональность программы
GIMP за счет распространения на условиях General Public License составляет достаточно высокую конкуренцию платным редакторам. Этому способствует и сравнительно мощный функционал, включающий:
- инструменты для фотокоррекции и управления цветом, включая регулировку насыщенности и баланса цветов, обесцвечивание и постеризацию;
- инструменты для рисования;
- возможность подключения графических планшетов;
- коррекцию изображений с помощью экранных фильтров;
- экспорт и импорт файлов формата pdf;
- редактирование текста;
- вычисления;
- категоризацию ресурсов;
- рендеринг;
- поддержку нескольких языков программирования для написания интерактивных сценариев.
Графический редактор имеет гибкий интерфейс, который можно настраивать по нескольким параметрам: группировке плавающих диалогов, перенастройке комбинаций клавиш, свободному перемещению любого меню. В качестве дополнения к программе GIMP имеется возможность установки утилиты UFRaw, которая служит для проявления цветных негативов формата Raw.
GIMP отличается высокой гибкостью архитектуры. Приложение совместимо с Windows, OS/2, Mac OS X и SkyOS. На базе GIMP разработано несколько специализированных программ, наиболее известные из которых – FilmGimp (ретуширование видео) и Seashore (упрощенная версия графического редактора).
Релизы
Программа GIMP впервые была выпущена в 1995 году. Графический редактор представлял собой дипломную работу двух начинающих программистов: С.Кимбелла и П.Маттиса. Впоследствии права на программу были проданы GNOME Foundation, а над дальнейшим развитием продукта стала работать целая команда добровольцев.
Актуальная версия GIMP имеет индекс 2.8.22. В сравнении с предыдущими релизами здесь были внесены изменения в иерархию окон, а также исправлены выявленные ошибки при импорте файлов с помощью плагинов. Новая версия потребляет заметно меньшее количество ресурсов ПК при установке, поэтому подходит для устройств с минимальными техническими характеристиками.
Скриншоты
Похожие программы
AutoCAD — система автоматизированного проектирования от Autodesk
CorelDRAW — программа для работы с векторной графикой
Adobe Photoshop CC
Blender
Adobe Photoshop — графический редактор, для обработки фотографий
GIMP — бесплатный графический редактор
Paint.NET — бесплатный инструмент для работы с растровой графикой
SketchUp — программа для создания несложных трехмерных моделей
Picasa — просматривайте, редактируйте и организовывайте изображения
FastStone Image Viewer
Sweet Home 3D
XnView
Krita
Adobe Illustrator
ArchiCAD
CINEMA 4D
Adobe InDesign
ACDSee — утилита для просмотра изображений на компьютере
Autodesk 3ds Max
Paint Tool SAI — графический редактор для цифрового рисования
Inkscape
Photoscape — программа, предназначенная для работы с растровой графикой
IrfanView
Компас-3D
Adobe Photoshop Lightroom
Autodesk Maya
Autodesk Inventor
SolidWorks
Autodesk Revit
NanoCAD
Fusion
Anime Studio Pro
Аудио | Видео программы
Графические программы
Microsoft Office
Игры
Интернет программы
Диски и Файлы
Adding Fonts for GIMP 2.x
System-Wide
Most distributions will propose a large choice of fonts in their package manager. The easier is usually to install them this way.
In case you want to manually add third-party fonts (commercial, downloaded…), adding fonts is usually just a matter of moving font files into a directory that is searched by the font system. Have a look at /etc/fonts/fonts.conf (and perhaps /etc/fonts/local.conf) to find out which directories are searched, or look for your operating system documentation. After copying the fonts there, you should run fc-cache to regenerate the fonts cache.
Some distributions also propose a graphical tool allowing to install fonts from third-party without bothering about the specifics.
Fonts added this way will be available to all applications using the Fontconfig system (such as GIMP).
For GIMP only
You might want to install fonts for use with GIMP only or you might not have permissions to install fonts system-wide. For such cases, GIMP 2.x also looks for fonts in a GIMP specific font search path. The default place where GIMP will look for user fonts is ~/.gimp-2.8/fonts/ but you can change it or add other directories by modifying your gimprc or in Edit -> Preferences -> Folders -> Fonts. Then press the Refresh button in the Fonts dialog and start using your new fonts.
Step 1
We’ll create a very simple web banner. Let’s start with a new image 468×60 px. Use white as the background color. Create new transparent layer. Select the whole image with Ctrl+A and fill it with black (Ctrl+,). Shrink the selection by 1 px () and delete the selection with Ctrl+K. We created a 1 px frame around out banner.
Now it’s time to put our logo or the main theme picture into the banner. I have prepared a masked-out flower you see on the picture on the left. I just pasted the flower below the border frame, used alpha to selection, created an empty layer below it and filled the selection with black using Ctrl+,. After that I blurred the shadow using Gaussian blur RLE and offset it by 2px to bottom right. I couldn’t resist adding the interlace effect using and a layer mask. In that layer mask i applied a b/w gradient, so that the left of the flower is not interlaced.
This part of the tutorial is not the key element, so feel free to experiment. Once you’re ready flatten the image using the .