Эмулятор playstation 3 для windows 7
Содержание:
- Первая «прибыль» и первые проблемы
- Нарушение авторских прав
- Advanced configuration
- Шаг 3: Отрегулируйте настройки графики и управления в эмуляторе RPCS3
- Настройка USB-джойстика для ПК
- Что такое эмулятор RPCS3?
- GPU configuration
- Как установить эмулятор PS на Андроид и запустить игры
- System configuration
- Audio configuration
- Debug configuration
- Как пользоваться RPCS3
- CPU configuration
- PS2 для компьютера с Windows
- Заключение
Первая «прибыль» и первые проблемы
Полный список всех людей, кто приложил руку к созданию эмулятора можно найти на официальном сайте RPCS3. Сейчас главу списка возглавляет Nekotekina, который подхватил разработку проекта после DH и Haykem. Это он создал страницу на краудфандинговом сервисе Patreon для сбора средств на поддержку самих разработчиков. Сумма уже перевалила за 3300$ в месяц, так что разработчики могут спокойно заниматься своими прямыми обязанностями весь день, не задумываясь о вопросе зарплаты.
Lost Planet: Extreme Condition на RPCS3Lost Planet: Extreme Condition на RPCS3
Но именно эта страничка на «Патреоне» стала тревожным звонком для разработчиков и издателей, чьи игры так и не получили свою реинкарнацию на персональных компьютерах. Недавно японская компания по разработке и изданию игр Atlus «наехала» на RPCS3 из-за успешной эмуляции Persona 5. Претензии японцы выставили администрации Patreon, чтобы те удалили целиком всю страничку для сбора средств.
Нарушение авторских прав
Представители RPCS3 убрали все упоминания Persona 5, и страницу никто удалять не стал. Однако если рассуждать логически, то по факту даже эти действия делать было не обязательно. Это глупо обвинять эмулятор в том, что на нем можно запускать игры, созданные для этой консоли. Неудивительно, что Persona 5, эксклюзив для PS3 и PS4, может работать и на эмуляторе PS3. Сам эмулятор не является нарушением интеллектуальной собственности разработчиков игр, поэтому обвинение в нарушении авторских прав здесь неуместно. Вот распространять образы игр — это не легально, а эмуляция в себе ничего противозаконного не несет.
Persona 5 на RPCS3Persona 5 на RPCS3
В целом, это проблема самих разработчиков, которые не хотят или не могут по каким-то причинам портировать свои игры на ПК или следующее поколение консолей. Вместо того, чтобы работать в этом направлении, заваливая Steam своими «портами», они пытаются прекратить все движения энтузиастов, крича о «пиратстве» на каждом углу. Игроки тратят время в «лагучем» эмуляторе с кучей багов не от того, что не хотят покупать игры, а из-за отсутствия альтернативы.
Naruto Shippuden: Ultimate Ninja Storm на RPCS3Naruto Shippuden: Ultimate Ninja Storm на RPCS3
Advanced configuration
| Setting | Default Option | Description |
|---|---|---|
| Debug console mode | Off | Increases the amount of usable system memory to match a DECR console and more. Causes some software to behave differently than on retail hardware. |
| Sleep Timers Accuracy | Usleep only | Changes the sleep period accuracy.As Host uses default accuracy of the underlying operating system, while All Timers attempts to improve it.Usleep Only limits the adjustments to usleep syscall only.Can affect perfomance in unexpected ways. |
| Maximum number of SPURS threads | Unlimited | Limits the maximum number of SPURS threads in each thread group. May improve performance in some cases, especially on systems with limited number of hardware threads. Limiting the number of threads is also likely to cause crashes. It’s recommended to keep this at default value. |
| Firmware settings | Load liblv2.sprx only | Load liblv2.sprx only: Closely emulates how games can load and unload system module files on a real PlayStation 3. Automatically load required libraries: Automatically selects the LLE libraries to load. While this option works fine in most cases, liblv2 is the preferred option. Manually load selected libraries: Allows the user to manually choose the LLE libraries to load. If unsure, don’t use this option. Nothing will work if you use this incorrectly. Load automatic and manual selection: Automatically selects the LLE libraries to load and allows the user to choose additional libraries manually. If unsure, don’t use this option. |
| Read depth buffers | Off | Initializes render target memory using vm memory. |
| Write depth buffers | Off | Writes depth buffer values to vm memory. |
| Read color buffers | Off | Initializes render target memory using vm memory. |
| Disable on-disk shader cache | Off | Disables the loading and saving of shaders from and to the shader cache in the data directory. |
| VBlank frequency | 60 Hz | Adjusts the frequency of vertical blanking signals that the emulator sends.Affects timing of events which rely on these signals.Only available on per-game configurations. |
| Clocks scale | 100% | Changes the scale of emulated system time.Affects software which uses system time to calculate things such as dynamic timesteps.Only available on per-game configurations. |
Шаг 3: Отрегулируйте настройки графики и управления в эмуляторе RPCS3
Большинство настроек эмулятора RPCS3 следует оставить по умолчанию, если только описание на странице RPCS3 не указывает на то, что для игры требуются специальные настройки. Однако есть две вещи, которые мы должны адаптировать к вашему компьютеру — графические настройки эмулятора, а также конфигурацию элемента управления (pad).
В эмуляторе RPCS3 перейдите на вкладку «Конфигурация> GPU». Появится новое окно с графическими настройками. Прежде всего на вкладке «Renderer» мы должны выбрать способ рендеринга графики. Vulkan определенно лучший, предполагая, что наша видеокарта поддерживает такой стандарт. Если у вас есть опция, на вкладке «Renderer» выбрать «Vulkan». Если такой поддержки нет, выберите «OpenGL».
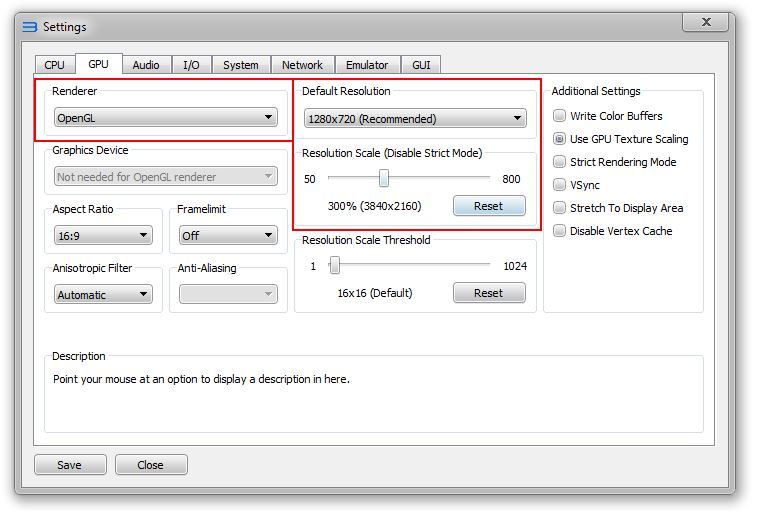
Еще одна вещь, заслуживающая внимания, — это разрешение. В поле «Разрешение по умолчанию» убедитесь, что установлено разрешение по умолчанию 1280×720 — мы не изменяем это разрешение.
Если, с другой стороны, вы хотите, чтобы игры отображались при более высоких разрешениях, вы можете установить их с помощью ползунка «Шкала разрешения» ниже.
Установка слайдера масштаба разрешения до 300% сделает игры обработанные в разрешении 3840×2160 (так называемый 4K). Вы также можете установить меньшее масштабирование, например, разрешение 2560×1440 (200%) или 1920×1080 (150%) — Поэкспериментируйте с этой опцией и проверьте, какое разрешение может обрабатывать ваша видеокарта, не уменьшая производительность игры.
После настройки графических параметров вы должны настроить элемент управления. По понятным причинам мы рекомендуем использовать любой пэд, предпочтительно из Xbox 360 или Dualshock с PS3 или PS4. Чтобы настроить его, щелкните значок с помощью контроллера.

Появится новое окно, в котором вы можете настроить элемент управления для каждого игрока. В разделе «Игрок 1» расширить поле «Клавиатура» и выберите свой пэд здесь. Если у вас есть Dualshock, подключенный к вашему компьютеру, выберите его в списке (например, «Dualshock 4»). Однако, если вы используете Xbox 360 / Xbox One (или любой другой, который был обнаружен как панель Xbox в играх), выберите «Xinput».
После выбора пэда нажмите на кнопку «Сохранить», для сохранения изменений. Теперь эмулятор настроен и готов к воспроизведению.
Настройка USB-джойстика для ПК
Далее от пользователя потребуется выполнить настройку джойстика эмулятора PS2 в качестве имитированного Wiimote или GameCube Pad в Dolphin.
Чтобы настроить USB-джойстик PS2 в последней версии Dolphin, необходимо сделать следующее:
Переходят к Wiimote > Эмуляция Wiimote > Конфигурировать.
Перед тем, как назначить кнопки, нажимают Clean.
Выбирают нужный джойстик в устройствах, например, DInput и устанавливают кнопки следующим образом:
Y > Верхняя кнопка (Треугольник или 1);
B > Правая кнопка (Обведите или 2);
A > Нижняя кнопка (Equis или 3);
X > Левая кнопка (Квадрат или 4);
Z > Ничего;
+ > Пуск;
Домой > Выбрать.
Что такое эмулятор RPCS3?
RPCS3 — настоящий эмулятор Playstation 3, доступный для компьютеров с установленной ОС Windows или Linux. Проект по-прежнему находится в альфа-фазе (ранние тесты), но он развивается очень быстро, из месяца в месяц решаются проблемы и улучшается игровая производительность. Это правда, что это еще не эмулятор, который запустит любую игру без заикания. Нельзя сравнивать его с точки зрения совместимости с такими долгосрочными проектами, как PCSX2 (эмулятор консоли PS2) или ePSXe (эмулятор консоли PSX).
Дело в том, что теперь вы можете играть в RPCS3 практически без проблем в нескольких играх, таких как Души Демона. Более того, они выглядят намного лучше, чем на консоли PS3, потому что эмулятор позволяет им работать с разрешением 4K. С каждым месяцем список поддерживаемых игр значительно расширяется.
GPU configuration
| Setting | Default Option | Description |
|---|---|---|
| Renderer | Vulkan | Vulkan is the fastest renderer while OpenGL is the most accurate renderer. If unsure, use Vulkan. Should you have any compatibility issues when using Vulkan, fall back to OpenGL. |
| Graphics device | NA | On multi GPU systems select which GPU to use in RPCS3 when using Vulkan. This is not needed when using OpenGL. |
| Aspect ratio | 16:9 | Leave this on 16:9 unless you have a 4:3 monitor. Auto also works well, especially if you use a resolution that is not 720p. |
| Framelimit | Off | Most games have an inbuilt framelimit and adding RPCS3’s limiter on-top of that will only hurt performance even if you’re well below reaching the cap. Off is the best option as it performs faster. Only use framelimiter if a game runs too fast without it. Some games will crash if the framerate is too high. If that happens, set value to anything other than Off. |
| Anisotropic filter | Automatic | Higher values increase sharpness of textures on sloped surfaces at the cost of GPU resources. Setting it to 16x provides the best quality and can be done on any modern GPU. However, some games (such as Unreal Engine titles) may have visual artifacts. In such cases, set it to Automatic to allow games to use their own inbuilt filtering methods. There’s not much reason to use a value below 16x as it will only look worse with the same performance and compatibility issues in certain games. |
| Anti-aliasing | Auto | Emulates PS3 multisampling layout.Can fix some visual artifacts in some games.Low to moderate performance hit depending on your GPU hardware. |
| Default resolution | 1280×720 | In most cases, do not change resolution in settings, leave it at 1280×720. Any other setting may result in compatibility issues and performance decrease. If you wish to try setting the resolution higher to 1920×1080, you MUST check the compatible resolutions for the game from the game list to ensure that it can support such a resolution. Forcing such resolution on games that do not support it will result in significant issues. Using resolutions lower than 1280×720 will not improve performance in any way. |
| Resolution scale | 100% | Scales the game’s resolution by the given percentage of the base resolution set in the above option. Set this value to 100% if you want to use the normal resolution. Note that you can use keyboard arrow keys for precise changes on the slide bars. |
| Resolution scale threshold | 16 x 16 | Only framebuffers greater than this size will be upscaled. Increasing this value might fix problems with missing graphics when upscaling, especially when Write Color Buffers is enabled. Do not touch this setting if you are unsure. Note that you can use keyboard arrow keys for precise changes on the slide bars. |
| Shader mode | Async (multi threaded) | Legacy (single threaded): Disables asynchronous shader compilation. Fixes missing graphics while shaders are compiling but introduces severe stuttering or lag. Use this if you do not want to deal with graphics pop-in, or for testing before filing any bug reports.Async (multi threaded): This is the recommended option. If a shader is not found in the cache, nothing will be rendered for this shader until it has compiled. You may experience graphics pop-in.Async with shader interpreter: Hybrid rendering mode. If a shader is not found in the cache, the interpreter will be used to render approximated graphics for this shader until it has compiled.Shader interpreter only: All rendering is handled by the interpreter with no attempt to compile native shaders. This mode is very slow and experimental. |
| Write color buffers | Off | Enable this option if you get missing graphics or broken lighting ingame. Might degrade performance and introduce stuttering in some cases. |
| Strict rendering mode | Off | Enforces strict compliance to the API specification. Might result in degraded performance in some games. Can resolve rare cases of missing graphics and flickering. Overrides settings for Resolution Scale and Resolution Scale Threshold and enforces default values. It is meant to disable all the shortcuts in the rendering path, and as such it trades speed and resolution options for the enhanced compatibility. |
| VSync | Off | By having this off you might obtain a higher frame rate at the cost of tearing artifacts in the game. |
| Stretch to display area | Off | Overrides the aspect ratio and stretches the image to the full display area. |
| Disable vertex cache | Off | Disables the vertex cache. Might resolve missing or flickering graphics output. May degrade performance. |
| Multithreaded RSX | Off | Offloads some RSX operations to a secondary thread. May improve performance for some high-core processors. May cause slowdown in some situations due to the extra worker thread load. |
Как установить эмулятор PS на Андроид и запустить игры
Установка эмулятора — одна из самых простых задач в процессе запуска игр для PlayStation. Пользователю достаточно иметь учётную запись Google Play.
- На главной странице магазина вбейте в поисковую строку либо название искомой программы, либо «эмулятор PS».
В Google Play Market предлагается огромное количество эмуляторов
- После установки приложение может потребовать от пользователя файл BIOS. Чаще всего используется SCPH1002, являющийся системным ROM для Европы. Его можно скачать из интернета, просто вбив в поисковую строку название. Загруженный файл необходимо разместить в корневой папке эмулятора или же оставить среди скаченных документов, а в самой программе настроить путь к BIOS через меню.
Перенесите файл BIOS в корневую папку эмулятора
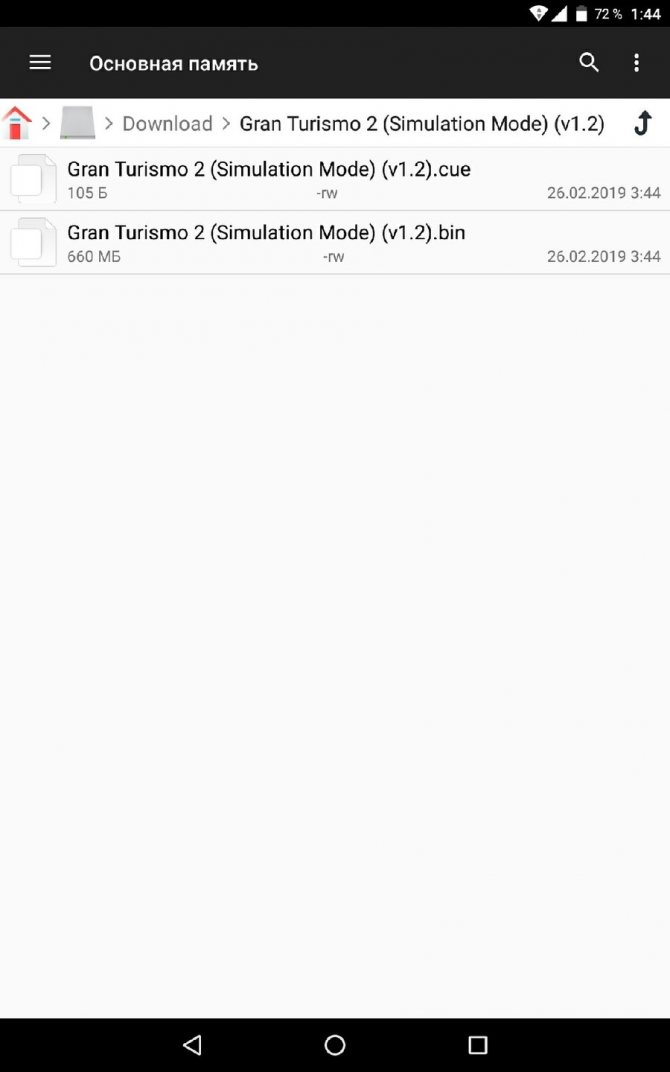
- После установки BIOS пользователь может смело приступать к скачиванию самих игр. Процесс довольно прост, ведь вам достаточно вбить в поисковой строке «Игры для PS1 скачать», чтобы получить доступ к сотням игр для японской консоли. Чаще всего игры скачиваются в архивах *.rar или *.zip, которые далеко не все проводники на Android способны открыть. Не забудьте заручиться поддержкой программы RAR, чтобы извлечь из пака необходимый образ в форматах img, iso или bin. Этот файл и является игрой, с которой эмулятору предстоит работать.
После установки эмулятора станет возможным запуск игр PS Размещайте игру в удобной для вас папке на устройстве или карте памяти. Теперь необходимо войти в эмулятор и произвести настройки. Они не обязательны, однако современные приложения предлагают игрокам выбрать качество графики, звука, настроить расположение клавиш навигации на экране и, даже, использовать внешний геймпад.
Теперь осталось лишь нажать заветную кнопку «Запустить игру», выбрать из списка или в проводнике тот самый скаченный образ и наслаждаться любимым с детства геймплеем!
System configuration
| Setting | Default Option | Description |
|---|---|---|
| Console language | English (US) | Some games may fail to boot if the system language is not available in the game itself. Other games will switch language automatically to what is selected here. It is recommended leaving this on a language supported by the game. |
| Console region | NA | Doesn’t exist (yet). |
| Enter button assignment | Enter with cross | The button used for enter/accept/confirm in system dialogs. You can change this to use the circle button instead, which is the default configuration on Japanese systems and in many Japanese games. In these cases, having the cross button assigned can often lead to confusion. |
| Clear disk cache automatically | Off | Automatically removes older files from disk cache on boot if it grows larger than the specified value. Games can use the cache folder to temporarily store data outside of system memory. It is not used for long-term storage. Default wipe size is set to 5120MB. Note that you can use keyboard arrow keys for precise changes on the slide bars. |
| Keyboard type | English keyboard (US Standard) | Sets the used keyboard layout. Currently only US, Japanese and German layouts are fully supported. |
| Homebrew: Enable /host_root/ | Off | Required for some Homebrew. If unsure, don’t use this option. |
Audio configuration
| Setting | Default Option | Description |
|---|---|---|
| Audio output (Windows) | XAudio2 | XAudio2 is the recommended option and should be used whenever possible. OpenAL uses a cross-platform approach and is the next best alternative. |
| Audio output (Linux) | OpenAL | OpenAL uses a cross-platform approach and supports audio buffering, so it is the recommended option. PulseAudio uses the native Linux sound system, and is the next best alternative. If neither are available, ALSA can be used instead. |
| Dump to file | Off | Saves all audio as a raw wave file. If unsure, leave this unchecked. |
| Convert to 16-bit | Off | Uses 16-bit audio samples instead of default 32-bit floating point. Use with buggy audio drivers if you have no sound or completely broken sound. |
| Downmix to stereo | On | Uses stereo audio output instead of default 7.1 surround sound. Use with stereo audio devices. Disable it only if you are using a surround sound audio system. |
| Volume | 100% | Controls the overall volume of the emulation. Values above 100% might reduce the audio quality. Note that you can use keyboard arrow keys for precise changes on the slide bars. |
| Enable buffering | On | Enables audio buffering, which reduces crackle and stutter but increases audio latency (requires XAudio2 or OpenAL). |
| Audio buffer duration | 100ms | Target buffer duration in milliseconds. Higher values make the buffering algorithm’s job easier, but may introduce noticeable audio latency. Note that you can use keyboard arrow keys for precise changes on the slide bars. |
| Enable time stretching | Off | Reduces crackle and stutter further, but may cause a very noticeable reduction in audio quality on slower CPUs. Requires audio buffering to be enabled. |
| Time stretching threshold | 75% | Buffer fill level (in percentage) below which time stretching will start. Note that you can use keyboard arrow keys for precise changes on the slide bars. |
| Microphone type | Null | Standard should be used for most games. Singstar emulates a singstar device and should be used with Singstar games. Real Singstar should only be used with a REAL Singstar device with Singstar games. Rocksmith should be used with a Rocksmith dongle. |
Debug configuration
Below configurations are primarily used by developers. If unsure, don’t use these options.
| Setting | Default Option | Description |
|---|---|---|
| Use legacy OpenGL buffers | Off | Enables use of classic OpenGL buffers which allows capturing tools to work with RPCS3 e.g RenderDoc. |
| Debug output | Off | Enables the selected API’s inbuilt debugging functionality. Will cause severe performance degradation especially with Vulkan. |
| Debug overlay | Off | Provides a graphical overlay of various debugging information. |
| Log shader programs | Off | Dump game shaders to file. |
| Use high precision Z-buffer | Off | Only useful when debugging differences in GPU hardware. |
| Disable ZCull occlusion queries | Off | Disables running occlusion queries. Minor to moderate performance boost. Might introduce issues with broken occlusion e.g missing geometry and extreme pop-in. |
| Force CPU blit emulation | Off | Forces emulation of all blit and image manipulation operations on the CPU. Requires ‘Write Color Buffers’ option to also be enabled in most cases to avoid missing graphics. Significantly degrades performance but is more accurate in some cases. This setting overrides the ‘GPU texture scaling’ option. |
| Disable Vulkan memory allocator | Off | Disables the custom Vulkan memory allocator and reverts to direct calls to VkAllocateMemory/VkFreeMemory. |
| Disable FIFO reordering | Off | Disables RSX FIFO optimizations completely. Draws are processed as they are received by the DMA puller. |
| Strict texture flushing | Off | Forces texture flushing even in situations where it is not necessary/correct. Known to cause visual artifacts, but useful for debugging certain texture cache issues. |
| Use GPU texture scaling | Off | Force all texture transfer, scaling and conversion operations on the GPU. May cause texture corruption in some cases. |
| PPU debug | Off | Never use this. |
| SPU debug | Off | Never use this. |
| Set DAZ and FTZ | Off | Never use this. |
| Accurate GETLLAR | Off | Never use this. |
| Accurate PUTLLUC | Off | Never use this. |
| Hook static functions | Off | Allows to hook some functions like ‘memcpy’ replacing them with high-level implementations. May do nothing or break things. Experimental. |
Как пользоваться RPCS3
Скачать эмулятор PS3 на ПК
Вам понадобиться последние версии эмулятора RPCS3 и прошивки для PlayStation 3. Их можно скачать с официальных сайтов производителей эмулятора и консоли.
Как настроить RPCS3
Распаковываем эмулятор в удобное для Вас расположение, и запускаем его от имени администратора Windows 10. Теперь принимаем условия использования и, отметив I have read the Quickstart, нажимаем Continue.
И сразу же устанавливаем прошивку нажав File > Install Firmware. В открывшемся окне проводника выбираем файл PS3UPDAT.PUP. Ждите завершения установки необходимых файлов из программного обеспечения Sony.

Как запустить игру RPCS3
В сети можно бесплатно загрузить образы игр для PS3. Обычно они в формате ISO и нуждаются в распаковке. Теперь любым способом открываем файл ISO и распаковываем его содержимое в пустую папку. После распаковки у Вас на диске появятся папки PS3_GAME и PS3_UPDATE.
Нажмите File > Boot Game или Open и укажите расположение папки PS3_GAME. Нажав кнопку Выбор папки, начнётся процесс установки игры. Дождитесь завершения и в новом окне запустится игра.

Всё зависит от типа загруженной игры. Если же в расположении есть файл с разрешением .pkg нужно будет нажимать File > Install .pkg. Аналогично дожидаетесь окончания процесса установки.
После установки игры можно посмотреть данные об игре
Нужно обратить внимание на вкладку Compatibility. Именно там указывается совместимость игры с эмулятором
К сожалению, некоторые игры плохо работают или вовсе не поддерживаются.
Список поддерживаемых игр RPCS3
На сайте производителя эмулятора можно посмотреть какие игры работают нормально, а с какими уже возникают определённые проблемы. Список поддерживаемых игр достаточно большой.
Загружайте игры только с зелёной отметкой Playable. Это значит что она уже была протестирована и её можно пройти без проблем. Все другие цвета говорят, что поиграть нормально не получится.

Заключение
- Процесс установки эмулятора RPCS3, последней прошивки и даже игр очень простой. К преимуществам стоит отнести поддержку клавиатуры и джойстиков. Буквально в несколько нажатий происходит установки игры и её запуск.
- Все игры уже были протестированы разработчиками эмулятора PS3. Перед загрузкой определённой игры лучше посмотреть её совместимость и как она работает. Например, Deadpool и Trine которые скачаны для теста работали ужасно.
- Консоли от Sony завоевали сердца многих пользователей. Большая благодарность разработчикам эмулятора RPCS3, который поддерживает около 2 тысяч игр. По сути, он даже не требует первоначально настройки, Вы можете сразу начинать играть.
CPU configuration
| Setting | Default Option | Description |
|---|---|---|
| PPU decoder | LLVM Recompiler | LLVM Recompiler: Recompiles the game’s executable once before running it for the first time. By far the fastest option and should always be used. Should you face compatibility issues, fall back to one of the Interpreters and retry. Interpreter (fast): The fastest interpreter. Trades accuracy for speed, and it very rarely breaks games even in comparison to the precise option. Try this if PPU LLVM Recompiler fails. Interpreter (precise): The most accurate Interpreter, but very slow to play games with. You may try this as a last resort if you encounter odd bugs or crashes. |
| SPU decoder | LLVM Recompiler | LLVM Recompiler: Fastest option with very good compatibility. Recompiles the game’s SPU LLVM cache before running which adds extra start-up time. If you experience issues, use the ASMJIT Recompiler. ASMJIT Recompiler: Fast option with very good compatibility. Interpreter (fast): Slower than the SPU ASMJIT Recompiler but significantly faster than Interpreter (precise). Games rarely need this option. Interpreter (precise): Extremely slow but may fix broken graphics in some games. |
| Enable thread scheduler | On | Allows the emulator to manually schedule physical cores to run specific tasks on, instead of letting the OS handle it. Very useful for AMD Ryzen systems on Windows, where it can give huge performance gains. Not recommended for Linux as the OS schedules the physical cores better on its own. No effect on Intel CPUs. |
| Lower SPU thread priority | Off | Runs SPU threads with lower priority than PPU threads. Usually faster on an i3 or i5, possibly slower or no difference on an i7 or Ryzen. |
| Enable SPU loop detection | On | Try to detect loop conditions in SPU kernels and use them as scheduling hints. Improves performance and reduces CPU usage. May cause severe audio stuttering in rare cases. |
| SPU cache | On | Should normally stay enabled. Disable this if the cache becomes too large. Disabling it does not remove the existing cache. |
| Accurate xfloat | Off | Fixes bugs in various games at the cost of performance. This setting is only applied when SPU LLVM is active. |
| TSX instructions | Enabled | Enable usage of TSX instructions. Needs to be forced on some Haswell or Broadwell CPUs. Forcing this on older Hardware can lead to system instability, use it with caution. |
| SPU block size | Safe | This option controls the SPU analyser, particularly the size of compiled units. Mega and Giga modes may improve performance by tying smaller units together, decreasing the number of compiled units but increasing their size. Use the Safe mode for maximum compatibility. |
| Preferred SPU threads | Auto | Some SPU stages are sensitive to race conditions and allowing a limited number at a time helps alleviate performance stalls. Setting this to a smaller value might improve performance and reduce stuttering in some games. Please note that the best value depends on the individual game and specific CPU being used, so users need to try different values themselves. Leave this on Auto if performance is negatively affected when setting a small value. |
PS2 для компьютера с Windows
Для настройки программы выполняют следующие шаги. Инструкция настройки эмулятора PS2:
Войти в Speed Hacks.
Активировать «Предустановку».
Устанавливают максимум в «Dañino» (любое имя).
Активируют блок MTVU, многопоточный MicroVU1 и подтверждают «Принять».
Вводят GS и устанавливают «5» в значение «Регулировка медленной скорости», а значение «Регулировка турбонагнетателя» устанавливают в «800». В кадрах прыжка ставят «2» и подтверждают «Принять».
Находят в «Выбор плагинов / BIOS».
Выбирают быстрый плагин для ПК x 2.
Входят в раздел «Плагины» и выбирают GSdx-SSE2 и нажимают «OK».
Устанавливают график, если у пользователя старый ПК: авто, Native, билинейный и подтверждают «Принять».
Заключение
На данный момент у эмулятора еще очень много минусов. Помимо багов и относительно небольшого списка «рабочих» игр, у RPCS3 те же проблемы, что и у PCSX2, эмулятора для предыдущей версии, — он крайне требователен к железу. Да, в ту же Persona 5 можно играть в разрешении 4к и при 60 fps, но на обычном компьютере, что даже тянет все современные игры, разогнаться до частоты свыше 30 кадров не удастся. Ко всему этому, инструкция по установке довольна сложна, и у рядового пользователя ПК может вызвать вполне объяснимые признаки ступора.
Tekken 6 на RPCS3Tekken 6 на RPCS3
Скорее всего, годный продукт мы все-таки получим, но к тому времени он уже будет не актуален. Пройдет немного времени и мы наверняка услышим о RPCS4 (название может быть изменено авторами будущего эмулятора), тем более, что по слухам DH и Haykem сейчас им и занимаются.
- God of War Collection запустили в эмуляторе RPCS3
- Red Dead Redemption, Persona 5, Dante’s Inferno и другие игры для PS3 запустили в высоком разрешении на PC через эмулятор RPCS3
- Эмулятор PS3 RPCS3 теперь поддерживает разрешения до 10K (видео)