Установка visual studioinstall visual studio
Содержание:
- Editions
- Управление исходным кодом и совместная работаManage your source code and collaborate with others
- Использование рефакторинга и IntelliSenseUse refactoring and IntelliSense
- Создание приложенияCreate the application
- Sign In to Visual Studio
- Visual Studio 2019 version 16.8.2
- Подключение к экземпляру SQL ServerConnect to a SQL Server instance
- Step 3 — Install the Visual Studio installer
- Шаг 3. Установка установщика Visual StudioStep 3 — Install the Visual Studio installer
- Supported SQL offerings
- Install the Visual Studio IDE
- Bundles[edit | edit source]
- Создать новые проектыCreate new projects
- 5) Установите GetFLV Player
- УдалениеUninstall
- Шаг 4. Выбор рабочих нагрузокStep 4 — Choose workloads
- Изменение файла проектаEdit the project file
- Установка более раннего выпускаInstalling an earlier release
Editions
Visual Studio is available for Windows and Mac. Visual Studio for Mac has many of the same features as Visual Studio 2017, and is optimized for developing cross-platform and mobile apps. This article focuses on the Windows version of Visual Studio 2017.
There are three editions of Visual Studio: Community, Professional, and Enterprise. See Compare Visual Studio editions to learn about which features are supported in each edition.
Visual Studio is available for Windows and Mac. Visual Studio for Mac has many of the same features as Visual Studio 2019, and is optimized for developing cross-platform and mobile apps. This article focuses on the Windows version of Visual Studio 2019.
There are three editions of Visual Studio 2019: Community, Professional, and Enterprise. See Compare Visual Studio editions to learn about which features are supported in each edition.
Управление исходным кодом и совместная работаManage your source code and collaborate with others
Вы можете управлять исходным кодом в репозиториях Git, размещенных любым поставщиком, в том числе и GitHub.You can manage your source code in Git repos hosted by any provider, including GitHub. С помощью Azure DevOps Services можно управлять кодом, а также ошибками и рабочими элементами для всего проекта.Or use Azure DevOps Services to manage code alongside bugs and work items for your whole project. Дополнительные сведения об управлении репозиториями Git в Visual Studio с использованием Team Explorer см. в статье Приступая к работе с Git и Azure Repos.See Get started with Git and Azure Repos to learn more about managing Git repos in Visual Studio using Team Explorer. В Visual Studio также предусмотрены другие встроенные элементы управления исходным кодом.Visual Studio also has other built-in source control features. Дополнительные сведения о них см. в статье блога Новые возможности Git в Visual Studio.To learn more about them, see New Git features in Visual Studio (blog).
Служба Azure DevOps Services — это облачные службы для планирования, размещения, автоматизации и развертывания программного обеспечения, а также совместной работы в группах.Azure DevOps Services are cloud-based services to plan, host, automate, and deploy software and enable collaboration in teams. Службы Azure DevOps поддерживают репозитории Git (распределенное управление версиями) и систему управления версиями Team Foundation (централизованное управление версиями).Azure DevOps Services support both Git repos (distributed version control) and Team Foundation Version Control (centralized version control). Они поддерживают конвейеры непрерывной сборки и поставки (CI/CD) кода, хранящегося в системах управления версиями.They support pipelines for continuous build and release (CI/CD) of code stored in version control systems. Службы Azure DevOps Services также поддерживают методологии разработки программного обеспечения Agile, Scrum и CMMI.Azure DevOps Services also support Scrum, CMMI and Agile development methodologies.
Team Foundation Server (TFS) — это центр управления жизненным циклом приложений для Visual Studio.Team Foundation Server (TFS) is the application lifecycle management hub for Visual Studio. Он позволяет всем лицам, участвующим в процессе разработки, использовать единое решение.It enables everyone involved with the development process to participate using a single solution. TFS также полезен для управления разнородными командами и проектами.TFS is useful for managing heterogeneous teams and projects, too.
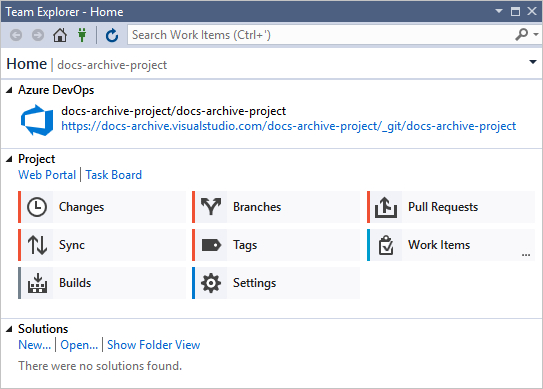
При наличии организации Azure DevOps или Team Foundation Server в сети к ним можно подключиться из окна Team Explorer в Visual Studio.If you have an Azure DevOps organization or a Team Foundation Server on your network, you connect to it through the Team Explorer window in Visual Studio. В этом окне можно извлекать и возвращать код в систему управления версиями, управлять рабочими элементами, запускать сборки и получать доступ к комнатам команд и рабочим областям.From this window you can check code into or out of source control, manage work items, start builds, and access team rooms and workspaces. Team Explorer можно открыть с помощью поля поиска или из главного меню Вид > Team Explorer или Команда > Управление подключениями.You can open Team Explorer from the search box, or on the main menu from View > Team Explorer or from Team > Manage Connections.
На изображении ниже показано окно Team Explorer для решения, размещенного в Azure DevOps Services.The following image shows the Team Explorer window for a solution that is hosted in Azure DevOps Services.
Вы также можете автоматизировать процедуру сборки, чтобы обеспечить сборку кода, который разработчики в вашей рабочей группе вернули в систему управления версиями.You can also automate your build process to build the code that the devs on your team have checked into version control. Например, можно создавать один или более проектов каждую ночь или всякий раз при возврате кода.For example, you can build one or more projects nightly or every time that code is checked in. Дополнительные сведения см. в описании Azure Pipelines.For more information, see Azure Pipelines.
Использование рефакторинга и IntelliSenseUse refactoring and IntelliSense
Рассмотрим несколько примеров того, как рефакторинг и IntelliSense помогают повысить эффективность кода.Let’s look at a couple of the ways that refactoring and IntelliSense can help you code more efficiently.
Во-первых, переименуем переменную :First, let’s rename the variable:
Дважды щелкните переменную , чтобы выбрать ее.Double-click the variable to select it.
Введите имя переменной, username .Type in the new name for the variable, username .
Обратите внимание, что вокруг переменной отображается серый прямоугольник, а в поле появляется значок лампочки.Notice that a gray box appears around the variable, and a light bulb appears in the margin.
-
Выберите значок лампочки для отображения доступных быстрых действий.Select the light bulb icon to show the available Quick Actions. Выберите Переименовать name в username .Select Rename ‘name’ to ‘username’ .
Переменная переименовывается во всем проекте, то есть в нашем случае только в двух местах.The variable is renamed across the project, which in our case is only two places.
Теперь рассмотрим возможности IntelliSense.Now let’s take a look at IntelliSense. Под строкой введите .Below the line that says , type .
Появится поле с членами класса DateTime.A box displays the members of the DateTime class. Кроме того, в отдельном поле отображается описание выбранного элемента.In addition, the description of the currently selected member displays in a separate box.
Выберите член с именем Now , который является свойством класса, дважды щелкнув его или нажав клавишу TAB . Завершите строку кода, добавив в конце точку с запятой.Select the member named Now , which is a property of the class, by double-clicking on it or pressing Tab . Complete the line of code by adding a semi-colon to the end.
Ниже введите или вставьте следующие строки кода:Below that, type in or paste the following lines of code:
Совет
Console.Write будет немного отличаться от Console.WriteLine в том, что не добавляет знак завершения строки после ее вывода.Console.Write is a little different to Console.WriteLine in that it doesn’t add a line terminator after it prints. Это означает, что следующий фрагмент текста, отправляемый на вывод, будет выводиться в той же строке.That means that the next piece of text that’s sent to the output will print on the same line. Можно навести указатель мыши на каждый из этих методов в коде, чтобы просмотреть его описание.You can hover over each of these methods in your code to see their description.
Далее мы снова используем рефакторинг, чтобы сделать код более кратким.Next, we’ll use refactoring again to make the code a little more concise
Щелкните переменную в строке .Click on the variable in the line .
Обратите внимание, что на поле в этой строке отображается маленький значок отвертки.Notice that a little screwdriver icon appears in the margin on that line.
Щелкните значок отвертки, чтобы увидеть предложения Visual Studio.Click the screwdriver icon to see what suggestions Visual Studio has available. В этом случае отображается рефакторинг Встроенная временная переменная для удаления строки кода без изменения его общего поведения:In this case, it’s showing the Inline temporary variable refactoring to remove a line of code without changing the overall behavior of the code:
Щелкните Встроенная временная переменная , чтобы выполнить рефакторинг кода.Click Inline temporary variable to refactor the code.
-
Снова запустите программу, нажав клавиши Ctrl+F5 .Run the program again by pressing Ctrl+F5 . Выходные данные выглядят следующим образом:The output looks something like this:
-
Снова запустите программу, нажав клавиши Ctrl+F5 .Run the program again by pressing Ctrl+F5 . Выходные данные выглядят следующим образом:The output looks something like this:
Создание приложенияCreate the application
Теперь можно приступить к разработке.It’s time to start developing. Мы добавим элемент управления »Кнопка», назначим кнопке действие и затем запустим приложение «Hello World», чтобы посмотреть, как оно выглядит.You’ll add a button control, add an action to the button, and then start the «Hello World» app to see what it looks like.
-
В Обозревателе решений дважды щелкните на файле MainPage.xaml, чтобы открыть разделенное представление.In the Solution Explorer, double-click MainPage.xaml to open a split view.
Откроется две панели: Конструктор XAML, содержащий холст конструктора, и редактор XAML, в котором можно добавлять и изменять код.There are two panes: The XAML Designer, which includes a design canvas, and the XAML Editor, where you can add or change code.
-
Щелкните Панель элементов, чтобы открыть всплывающее окно «Панель элементов».Choose Toolbox to open the Toolbox fly-out window.
(Если параметр Панель элементов отсутствует, его можно открыть в строке меню.(If you don’t see the Toolbox option, you can open it from the menu bar. Для этого выберите Вид > Панель инструментов.To do so, choose View > Toolbar. Либо нажмите клавиши CTRL+ALT+X.)Or, press Ctrl+Alt+X.)
-
Щелкните значок Закрепить, чтобы закрепить окно «Панель элементов».Click the Pin icon to dock the Toolbox window.
-
Щелкните элемент управления Кнопка и перетащите его на холст конструктора.Click the Button control and then drag it onto the design canvas.
Если посмотреть на код в редакторе XAML, мы увидим, что кнопка была также добавлена туда:If you look at the code in the XAML Editor, you’ll see that the Button has been added there, too:
В редакторе XAML измените значение параметра Content кнопки с «Button» на «Hello World!».In the XAML Editor, change Button Content value from «Button» to «Hello World!»
Обратите внимание, что кнопка в Конструкторе XAML также изменится.Notice that the button in the XAML Designer changes, too.
Добавление обработчика событийAdd an event handler
Название «обработчик событий» звучит как что-то сложное, но это всего лишь еще одно имя в коде, которое вызывается, когда происходит какое-то событие.An «event handler» sounds complicated, but it’s just another name for code that is called when an event happens. В нашем случае он добавляет действие к кнопке «Hello World!».In this case, it adds an action to the «Hello World!» .button.
-
Дважды щелкните элемент управления «Кнопка» на холсте конструктора.Double-click the button control on the design canvas.
-
Измените код обработчика событий в файле MainPage.xaml.cs, страница с выделенным кодом.Edit the event handler code in MainPage.xaml.cs, the code-behind page.
Здесь начинается самое интересное.Here is where things get interesting. Обработчик события по умолчанию выглядит так:The default event handler looks like this:
Давайте изменим его, чтобы он выглядел следующим образом:Let’s change it, so it looks like this:
Ниже приведен код для копирования и вставки:Here’s the code to copy and paste:
Что же мы только что сделали?What did we just do?
Этот код использует некоторые функции API Windows для создания объекта синтеза речи и передает ему некоторый текст для озвучивания.The code uses some Windows APIs to create a speech synthesis object and then gives it some text to say. (Дополнительные сведения об использовании см. в статье System.Speech.Synthesis.)(For more information on using , see System.Speech.Synthesis.)
Sign In to Visual Studio
When you start Visual Studio for the first time, you are given the chance to sign in using a Microsoft account such as Live or Outlook. Signing in allows your settings to be synchronized across all your devices. For more information, see Signing in to Visual Studio
Figure 1: Visual Studio IDE
After you open Visual Studio, you can see the three basic parts of the IDE: tool windows, menus and toolbars, and the main window space. Tool windows are docked on the left and right sides of the app window, with Quick Launch, the menu bar, and the standard toolbar at the top. The center of the application window contains the Start Page. When you open a solution or project, editors and designers appear in this space. When you develop an application, you’ll spend most of your time in this central area.
Visual Studio 2019 version 16.8.2
released November 19, 2020
Issued Addressed in this Release of Visual Studio 2019 version 16.8.2
- Fixed for optimization bug in loops.
- Fixed internal compiler error in implementation of guaranteed copy elision (C++17 feature).
- Fixed build perf regression for large uses of anonymous types.
- Resolved an issue where a gold bar with the message «Specified argument was out of the range of valid values» would appear when editing C# code.
- Fixed an issue that could cause a MissingMethodException when building a project that had T4 templates.
- Fixes an issue where the search in the New Project Dialog could return zero results.
From Developer Community
- KeyNotFoundException reported by SolutionAssetStorage.GetAssetAsync results in gold bar
- IntelliSense fails because designtime build can’t find ‘GetClCommandLineForReference’ target
- IOException (Pipe is broken) reported by GetAssetAsync
- Search is not working
- Optimizer incorrectly removed EH information causing some exceptions to crash
Подключение к экземпляру SQL ServerConnect to a SQL Server instance
Примечание
В декабре 2021 г. выпуски SSMS до версии 18.6 перестанут использовать многофакторную проверку подлинности через Azure Active Directory.In December 2021, releases of SSMS prior to 18.6 will no longer authenticate through Azure Active Directory with MFA.
Чтобы и дальше использовать проверку подлинности Azure Active Directory с MFA, установите SSMS 18.6 или более поздней версии.To continue utilizing Azure Active Directory authentication with MFA, you need SSMS 18.6 or later.
-
Запустите среду SQL Server Management Studio.Start SQL Server Management Studio. При первом запуске SSMS откроется окно Подключение к серверу.The first time you run SSMS, the Connect to Server window opens. Если этого не происходит, вы можете открыть его вручную, последовательно выбрав Обозреватель объектов > Подключить > Ядро СУБД.If it doesn’t open, you can open it manually by selecting Object Explorer > Connect > Database Engine.
-
В окне Подключение к серверу сделайте следующее по списку ниже.In the Connect to Server window, follow the list below:
- В поле Тип сервера выберите Ядро СУБД (обычно это параметр по умолчанию).For Server type, select Database Engine (usually the default option).
- В поле Имя сервера введите имя своего экземпляра SQL Server.For Server name, enter the name of your SQL Server instance. (В этой статье используется имя экземпляра SQL2016ST и имя узла NODE5: NODE5\SQL2016ST.) Если вы не знаете, как определить имя экземпляра SQL Server, см. раздел .(This article uses the instance name SQL2016ST on the hostname NODE5 .) If you’re unsure how to determine your SQL Server instance name, see .
- В поле Проверка подлинности выберите Проверка подлинности Windows.For Authentication, select Windows Authentication. В этой статье используется проверка подлинности Windows, но поддерживаются также и учетные данные SQL Server.This article uses Windows Authentication, but SQL Server login is also supported. При выборе Учетных данных SQL отобразится запрос на ввод имени пользователя и пароля.If you select SQL Login, you’re prompted for a username and password. Дополнительные сведения о типах проверки подлинности см. в разделе Подключение к серверу (ядро СУБД).For more information about authentication types, see Connect to the server (database engine).
Вы также можете изменить дополнительные параметры подключения, выбрав Параметры.You can also modify additional connection options by selecting Options. Примеры параметров подключения: база данных, к которой вы подключаетесь, время ожидания подключения и сетевой протокол.Examples of connection options are the database you’re connecting to, the connection timeout value, and the network protocol. Эта статья использует во всех параметрах значения по умолчанию.This article uses the default values for all the options.
-
После заполнения всех полей выберите Подключить.After you’ve completed all the fields, select Connect.
Примеры успешных соединенийExamples of successful connections
Чтобы проверить, успешно ли установлено подключение к серверу SQL Server, просмотрите объекты в обозревателе объектов.To verify that your SQL Server connection succeeded, expand and explore the objects within Object Explorer. Эти объекты будут различаться в зависимости от типа сервера, к которому установлено подключение.These objects are different depending on the type of server you choose to connect.
-
Подключение к локальному серверу SQL Server — NODE5\SQL2016ST: Connecting to an on-premises SQL server — in this case NODE5\SQL2016ST:
-
Подключение к базе данных SQL Azure — msftestserver.database.windows.net: Connecting to SQL Azure DB — in this case msftestserver.database.windows.net:
Примечание
Ранее в этой статье вы подключились к локальному серверу SQL Server с помощью проверки подлинности Windows, но для базы данных SQL Azure этот способ не поддерживается.In this article, you previously used Windows Authentication to connect to your on-premises SQL server, but this method is not supported for SQL Azure DB. На этом рисунке показано подключение к базе данных SQL Azure с помощью проверки подлинности SQL.As such, this image shows using SQL Authentication to connect to the SQL Azure DB. Дополнительные сведения см. в разделах, посвященных локальной проверке подлинности SQL и .For more information, see SQL on-premises authentication and .
Step 3 — Install the Visual Studio installer
Run the bootstrapper file to install the Visual Studio Installer. This new lightweight installer includes everything you need to both install and customize Visual Studio.
-
From your Downloads folder, double-click the bootstrapper that matches or is similar to one of the following files:
- vs_community.exe for Visual Studio Community
- vs_professional.exe for Visual Studio Professional
- vs_enterprise.exe for Visual Studio Enterprise
If you receive a User Account Control notice, choose Yes.
-
We’ll ask you to acknowledge the Microsoft License Terms and the Microsoft Privacy Statement. Choose Continue.
Шаг 3. Установка установщика Visual StudioStep 3 — Install the Visual Studio installer
Запустите файл начального загрузчика, чтобы установить Visual Studio Installer.Run the bootstrapper file to install the Visual Studio Installer. Новый установщик имеет меньший размер и включает все необходимое для установки и настройки Visual Studio.This new lightweight installer includes everything you need to both install and customize Visual Studio.
-
В папке Загрузки дважды щелкните файл начального загрузчика, имя которого совпадает с именем одного из следующих файлов или похоже на них:From your Downloads folder, double-click the bootstrapper that matches or is similar to one of the following files:
- vs_community.exe для Visual Studio Community.vs_community.exe for Visual Studio Community
- vs_professional.exe для Visual Studio Professional;vs_professional.exe for Visual Studio Professional
- vs_enterprise.exe для Visual Studio Enterprise;vs_enterprise.exe for Visual Studio Enterprise
Если появляется оповещение системы контроля учетных записей, нажмите кнопку Да.If you receive a User Account Control notice, choose Yes.
-
Мы попросим вас принять условия лицензии и заявление о конфиденциальности корпорации Майкрософт.We’ll ask you to acknowledge the Microsoft License Terms and the Microsoft Privacy Statement. Нажмите Продолжить.Choose Continue.
Supported SQL offerings
- This version of SSMS works with all supported versions of SQL Server 2008 — SQL Server 2019 (15.x) and provides the greatest level of support for working with the latest cloud features in Azure SQL Database and Azure Synapse Analytics.
- Additionally, SSMS 18.x can be installed side by side with SSMS 17.x, SSMS 16.x, or SQL Server 2014 SSMS and earlier.
- SQL Server Integration Services (SSIS) — SSMS version 17.x or later doesn’t support connecting to the legacy SQL Server Integration Services service. To connect to an earlier version of the legacy Integration Services, use the version of SSMS aligned with the version of SQL Server. For example, use SSMS 16.x to connect to the legacy SQL Server 2016 Integration Services service. SSMS 17.x and SSMS 16.x can be installed side by side on the same computer. Since the release of SQL Server 2012, the SSIS Catalog database, SSISDB, is the recommended way to store, manage, run, and monitor Integration Services packages. For details, see SSIS Catalog.
Install the Visual Studio IDE
In this section, you’ll create a simple project to try out some of the things you can do with Visual Studio. You’ll use IntelliSense as a coding aid, debug an app to see the value of a variable during the program’s execution, and change the color theme.
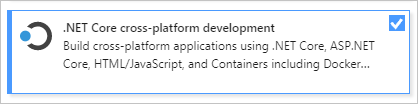
To get started, download Visual Studio and install it on your system. The modular installer enables you to choose and install workloads, which are groups of features needed for the programming language or platform you prefer. To follow the steps for , be sure to select the .NET Core cross-platform development workload during installation.
To get started, download Visual Studio and install it on your system. The modular installer enables you to choose and install workloads, which are groups of features needed for the programming language or platform you prefer. To follow the steps for , be sure to select the .NET Core cross-platform development workload during installation.
When you open Visual Studio for the first time, you can optionally sign in using your Microsoft account or your work or school account.
Bundles[edit | edit source]
Создать новые проектыCreate new projects
Самый простой способ создать проект — начать с шаблона проекта для приложения или веб-сайта определенного типа.The easiest way to create a new project is to start from a project template for a particular type of application or website. Шаблон проекта состоит из базового набора предварительно созданных файлов кода, файлов конфигурации, активов и параметров.A project template consists of a basic set of pre-generated code files, config files, assets, and settings. Эти шаблоны доступны в диалоговом окне создания проекта (Файл > Создать > Проект).These templates are available in the dialog box where you create a new project (File > New > Project). Дополнительные сведения см. в статьях Создание нового проекта в Visual Studio и Создание решений и проектов.For more information, see Create a new project in Visual Studio and Create solutions and projects.
Если вы часто настраиваете проекты определенным образом, то можете создать пользовательский шаблон проекта, на основе которого будете создавать новые проекты.If you often customize your projects in a certain way, you can create a custom project template that you can then use to create new projects from. Дополнительные сведения см. в статье Создание шаблонов проектов и элементов.For more information, see Create project and item templates.
При создании нового проекта он сохраняется по умолчанию в %USERPROFILE%\source\repos.When you create a new project, it is saved by default at %USERPROFILE%\source\repos. Вы можете изменить это расположение при помощи параметра Расположение проекта в разделе Средства > Параметры > Проекты и решения > Расположения.You can change this location in the Projects location setting under Tools > Options > Projects and Solutions > Locations. Дополнительные сведения см. в разделе страница «Проекты и решения», диалоговое окно «Параметры».For more information, see Projects and Solutions page, Options dialog box.
5) Установите GetFLV Player
УдалениеUninstall
Набор SSMS имеет общие компоненты с другими решениями, которые останутся установленными после его удаления.There are shared components that remain installed after you uninstall SSMS.
Сюда входят следующие компоненты:The shared components that remain installed are:
- Azure Data StudioAzure Data Studio
- Microsoft .NET Framework 4.7.2Microsoft .NET Framework 4.7.2
- Драйвер Microsoft OLE DB для SQL ServerMicrosoft OLE DB Driver for SQL Server
- Microsoft ODBC Driver for SQL Server версии 17Microsoft ODBC Driver 17 for SQL Server
- Распространяемый компонент Microsoft Visual C++ 2013 (x86)Microsoft Visual C++ 2013 Redistributable (x86)
- Распространяемый компонент Microsoft Visual C++ 2017 (x86)Microsoft Visual C++ 2017 Redistributable (x86)
- Распространяемый компонент Microsoft Visual C++ 2017 (x64)Microsoft Visual C++ 2017 Redistributable (x64)
- Microsoft Visual Studio Tools for Applications 2017Microsoft Visual Studio Tools for Applications 2017
Эти компоненты не удаляются, так как могут являться общими с другими продуктами.These components aren’t uninstalled because they can be shared with other products. Их удаление может нарушить работу этих продуктов.If uninstalled, you may run the risk of disabling other products.
Шаг 4. Выбор рабочих нагрузокStep 4 — Choose workloads
Когда завершится установка программы установки, вы можете с ее помощью выбрать нужные наборы функций (рабочих нагрузок).After the installer is installed, you can use it to customize your installation by selecting the feature sets—or workloads—that you want. Ниже описывается порядок действий.Here’s how.
-
Найдите нужную рабочую нагрузку в Visual Studio Installer.Find the workload you want in the Visual Studio Installer.
Например, выберите рабочую нагрузку «Разработка классических приложений .NET».For example, choose the «.NET desktop development» workload. В нее входит основной редактор кода по умолчанию, который предоставляет базовую поддержку редактирования кода для более чем 20 языков, возможность открывать и изменять код в любой папке без наличия проекта и интегрированное управление исходным кодом.It comes with the default core editor, which includes basic code editing support for over 20 languages, the ability to open and edit code from any folder without requiring a project, and integrated source code control.
-
Выбрав нужные рабочие нагрузки, нажмите кнопку Установить.After you choose the workload(s) you want, choose Install.
Далее будут отображаться экраны состояния, на которых демонстрируется ход установки Visual Studio.Next, status screens appear that show the progress of your Visual Studio installation.
-
Найдите нужную рабочую нагрузку в Visual Studio Installer.Find the workload you want in the Visual Studio Installer.
Например, выберите рабочую нагрузку «ASP.NET и разработка веб-приложений».For example, choose the «ASP.NET and web development» workload. В нее входит основной редактор кода по умолчанию, который предоставляет базовую поддержку редактирования кода для более чем 20 языков, возможность открывать и изменять код в любой папке без наличия проекта и интегрированное управление исходным кодом.It comes with the default core editor, which includes basic code editing support for over 20 languages, the ability to open and edit code from any folder without requiring a project, and integrated source code control.
-
Выбрав нужные рабочие нагрузки, нажмите кнопку Установить.After you choose the workload(s) you want, choose Install.
Далее будут отображаться экраны состояния, на которых демонстрируется ход установки Visual Studio.Next, status screens appear that show the progress of your Visual Studio installation.
Совет
В любой момент после установки можно установить рабочие нагрузки или компоненты, которые не были установлены изначально.At any time after installation, you can install workloads or components that you didn’t install initially. Если среда Visual Studio открыта, выберите пункт Сервис > Получить средства и компоненты… ; откроется Visual Studio Installer.If you have Visual Studio open, go to Tools > Get Tools and Features… which opens the Visual Studio Installer. Visual Studio Installer можно также открыть из меню «Пуск».Or, open Visual Studio Installer from the Start menu. Здесь можно выбрать рабочие нагрузки или компоненты, которые нужно установить.From there, you can choose the workloads or components that you wish to install. Затем выберите Изменить.Then, choose Modify.
Изменение файла проектаEdit the project file
Измените файл проекта, чтобы настроить некоторые функции в MSBuild, например Импорт целевых объектов преобразования текста.Edit your project file to configure some of the features in MSBuild, for example, importing the text transformation targets.
В Обозреватель решенийв контекстном меню проекта выберите пункт выгрузить .In Solution Explorer, choose Unload from the right-click menu of your project. Это позволит изменить CSPROJ- или VBPROJ-файл в редакторе XML.That allows you to edit the .csproj or .vbproj file in the XML editor. Завершив редактирование, нажмите кнопку перезагрузить.When you’ve finished editing, choose Reload.
Установка более раннего выпускаInstalling an earlier release
Вы можете создать и использовать автономную установку или скачать и запустить один из указанных ниже установщиков.You can either create and use an offline installation, or you can download and launch one of the installers below directly.
Чтобы создать автономную установку, следуйте инструкциям из статьи Создание автономной установки Visual Studio, заменив указанные там файлы начального загрузчика на приведенные ниже версии.To create an offline installation, follow the instructions at Create an offline installation of Visual Studio, replacing the bootstrapper files referenced in the document with the versions below.
Если в вашей организации стандартизирован определенный базовый план обслуживания Visual Studio 2019, мы рекомендуем всегда оставаться на последнем служебном выпуске в рамках этого плана.If your organization has standardized on a particular servicing baseline of Visual Studio 2019, we recommended staying current with the latest servicing release of that supported baseline. Дополнительные номера версии, которые были объявлены как поддерживаемые базовые планы обслуживания Visual Studio 2019: 16.0.The minor versions that have been declared as supported servicing baselines for Visual Studio 2019 are: 16.0. См. дополнительные сведения в нашей политике поддержки.Refer to our support policy for additional information.